After you have your pattern pieces ready, its time to cut the fabric.
Very sorry about the quality of the photos - its a combination of light and me really.
Plus what was I thinking when I started with this fabric. Has been so hard to show the right and wrong side; I have to make another tutorial with a better fabric.
Starting from selvage mark 1.5 cm (seam allowance)
Mark the breadth of the pattern piece onto the fabric starting from the marked point
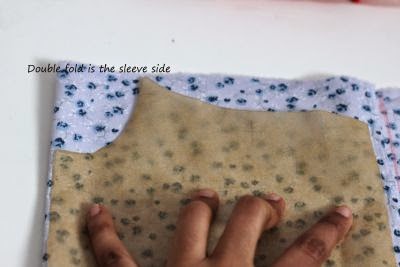
Fold the fabric in the steps shown - There must be 2 folds on one side
One fold and 2 edges on the other. Let me know if it is not clear I can show some more pics.
Showing one side
Showing the other side
Put the body pattern piece such that the sleeve side is on the 2 fold side.
Cut
This is how it looks. No side seams. Just one seam on the back.
Now cut 2 pieces of front yoke on fold (right side wrong side doesn't matter)
If you want to know what cut on fold or lengthwise grain means - refer to tutorial.
The cut pieces
Cut 2 pieces of back yoke on fold
Cut the folded edge to make it 4 pieces.
Total pattern pieces. 1 body, 2 front yoke and 4 back yoke
Between the 2 red points on the front run gathering stitches. 2 rows of basting above the stitching line and one below. Detailed gathering technique available here - gathering stitches.
At the back gather from the red line and stop 1.5 from the edge. Do the same at both the back pieces.
3 rows of basting forms neat gathers
Now we will finish the sleeves using bias tape. I just bought some bias tape but have also tried making the same. You can see the dress I made here.
Pin right side of bias tape with wrong side of fabric.
Make your own bias tape with bias tape maker or pins
Sew on the folded crease
Now fold the bias tape towards the right side of fabric making sure the stitching line is just covered.
Sew over the bias tape from the right side just at the edge.
Neat! Do the same on other sleeve. Sleeves couldn't be easier.
Sew right sides together at the back leaving 8cm from the top. Zig zag stitch or serge the ends.
Also hem the bottom of the skirt with your favorite style to hem - I used this method I used in phus phus skirt to hem.


Neat sewing instructions... I am sure, even the beginners can understand them clearly!
ReplyDeleteRegards,
Sindhu
Tantu
The Arts & Me
I hope so too Sindhu.
DeletePlease show more pics of the folding step:
Delete"Fold the fabric in the steps shown - There must be 2 folds on one side
One fold and 2 edges on the other. Let me know if it is not clear I can show some more pics."
Thanks!
Joan
Hi Joan, I haven't ignored you. Sorry. Its just taken me sometime to articulate rightly what I wanted to explain. I wanted to have no side seams so the cutting and layout were a a couple of steps. I have demonstrated with paper here. - https://www.flickr.com/photos/widicreations/17169368362/
DeleteHope it helps.
I'm in the process of making this for my daughter. Thank you for your instructions and your refreshing sense of self-deprecating humor. :-)
ReplyDelete