Friday 31 January 2014

What is basting

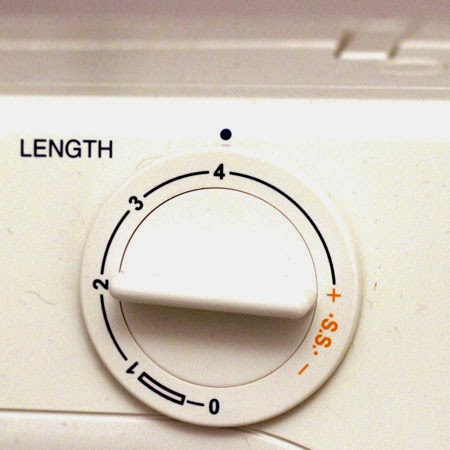
Basting is to run a stitching line with the longest stitch length.(4 on my machine).

What is basting and why is it used

What is basting

 Uses are:
1. Temporarily hold the fabrics together before running the actual stitch. Its quick since it takes less time due to stitch length. I've used this for collars for a dress made for my daughter.
2. Temporarily hold the fabric to the zipper.  I've had not much luck with zips. Now that I've a new foot, I'll give it another so. You can see the post here - zipper foot not working
3Gathering You can see how basting rows of stitching helps in perfect gathers. - the gathering stitches are also called basting stitches.
4. Easing at the sleeves. Similar method of gathering is used to create ease at the top of the sleeves.

Thanks for reading.
Have a good weekend.

If you enjoyed reading this you can either like my facebook page to get all updates and more or you can opt to receive posts via email. Don't forget to activate your subscription though!

How to and not to gather

Hi All, Today I want to show you how I gather fabric. I've used gathering for most of the clothes I've sewn - skirt, dress, summer dress. 

My first free pattern phus phus skirt is gathered this way.

Gathering is a technique to crunch up the fabric to attach a longer piece of fabric to a shorter one. Before I show you my preferred method I also want to show to other methods I've tried. My preferred method finish is super :). I've made a miniature version here just for the tutorial.
Gathering - How to sew perfect gathers

 I'm not the first person to discover this I'm sure, but at least I can call it my learning :). Many of you might have been doing this way your sewing life. :)

Gathering - Sewing different ways compared and best way shown

Below is step by step instructions:
I'm here using a 2 cm seam allowance. All steps are shown for 1 row of gathering. For all the rest the steps are the except the number of rows of gathering and where you run the gathering stitches vary.  Below shows you how many and where to run the stitches. The faded blue line if the seam allowance.
3 rows of gathering to stitch perfect spaced gathers

Sorry about the spelling above. I'm unable to find the raw photos to edit now.
 
Below are some skirts where I've used the 3 rows with 3rd beyond seam allowance method.
gathering technique


I've made a mini tutorial for my fav method. Mini tutorial here.

Detailed steps below:

How to gather
1. Use a contrast colour threadDivide the body and skirt into 4 equal sections (quarter and center)  and mark them(I just fold fabric to find centers - doesnt have to be accurate). The skirt width I'm using here is 3 times that of body. The horizontal line on skirt is the 2cm seam allowance.


Basting stitches to gather
2. Use longest stitch length on your machine - 4 in my case.
long tail of fabric
3. Leave a long tail of thread both bobbin and top thread (these will be used to pull and make the gather)
 4.  Do not back stitch and stitch a row of gathering midway of seam allowance within seam allowance(1 cm in my case).
For 2 gathers sew 1 row at 0.7 and another at 0.7cm from first row.
For 3 gathers sew 1 row at 05, 3nd at 1 and 3rd at 1.5 cm from cut fabric.
For 3 gathers with row outside seam allowance sew 1 row at 0.8, second at 0.8 from first and 3rd row  0.8 cm from 2nd row.
I just eyeball it - the whole idea is to divide the area equally.
5. At the end again do not back stitch and leave a long tail.

Now we are ready to gather.
 6. Separate bobbin thread from the top thread (I'm here using a seam ripper).

7. Place the body on skirt with right sides together (the front of body facing down with front of skirt). Its difficult here to see right and wrong sides of fabric - wrong choice I agree. :)
8. Now pin at 5 places aligning the markings we made in step 1. - 2 at sides, 1 in center and 2 at quarters.
 This is how the back or the wrong side looks.


9. Pull the bobbin thread away from the fabric with one hand (left hand if you are right handed) and with right hand pull the gathers formed towards the fabric.
10. Push the gathers towards center of skirt. Repeat step 9 from the other side of the skirt till the skirt and body are of equal width.
Let call this the pull push method. :)
It is now gathered but not even.
how to spread the gathers
11. Using a skewer or a chop stick or similar spread the gathers so they look even.
Now they look lot better - evenly gathered.
12. Don't forget to set the machine to normal stitch length.
13. With a 2 cm seam allowance , sew two stitches and then back stitch this time.This is going be a permanent stitching. Also I find that its really important to hold the fabric with your left hand perpendicular to the stitching line. This prevents the gathers from angling - if that's a word :)towards you or other way. usually it angles towards you.

Done!!. Now remove the gathering stitches - if you have a contrast colour thread its easy :). If you had been lazy then you'll now spend more time :).


For the last and best option of 3 rows of gathering you'll need to sew 2 rows on top of seam allowance and 3rd below seam allowance. A few pictures below.
This is a mini tutorial. :)
3 rows basting to stitch gathers
Follow steps 1-6 to sew 3 rows of gathers - 2 above seam line and one after seam line.
sew between basting to gather
Follow steps 7-10 - pull push method. You can see the gathers are not even and they are angled in most places.
How to spread gathers evenly with chopstick
Spread the gathers using a chopstick or something similar - step 11 so they are perpendicular to the sewing line.
Stitching gathering to make frills

 Follow step 12-13 to sew along seam line.Remove the gathering stitches and press.


Thanks for reading.
Did you find it useful?

-Preethi.

If you enjoyed reading this you can either like my facebook page to get all updates and more or you can opt to receive posts via email. Don't forget to activate your subscription though!

Sunday 26 January 2014

How to wind bobbin

Ok. I have to admit - I struggled a lot when I was learning to wind the bobbin. It took me a week to learn this - people who know to sew must be thinking - a week?? yes, I did. :) try it leave it try it leave it and it was getting very frustrating. I guess it is easy for people who have seen others sew or have grown up sewing. Since I was completely new to this I had to learn it the hard way. Actually there was only one step that I was missing. Read on and I'll show what what that one silly step was :)
In this blog I'm always trying to show what I struggled with so its easy for others. Hope it is useful.

This is part of Sewing basics series where I'm posting the real basics and wish I had known those little missing elements when I started couple of months back.

How to wind bobbin:

1. My machine came with a few empty bobbin which was handy. Get yourself a bobbin if you don't have one.

How to wind bobbin in sewing machine
2. Place the thread from which to wind to the bobbin on the thread spool pins in the direction shown.

Winding guide sewing machine
3. Wind the thread around the bobbin winding guide.

How to insert thread in bobbin
4. Pull the thread through one of the holes in the bobbin from the inside. There are holes on either side
Bobbin winding holder
5.Place the bobbin on the bobbin winding holder next to the thread spool.

Push bobbin direction


6. Push the bobbin right in the direction shown. This was something I didn't do or understand for a week and struggled to wind the bobbin. Sounds silly now :)
Sewing machine handwheel
7. Pull the hand wheel out.
 sewing machine power supply
8. Connect the sewing machine to power supply and switch it on.

How to wind bobbin in janome
7. Holding the thread from the bobbin press the foot control down slowly.


8. Just like accelerator of car slowly but steadily press the foot control. I've noticed that if you press a lot then the thread spool will start to wobble, so its best to be slow and steady.

bobbin thread how to wind
9. For the first say 10 windings around the bobbin I keep hold of the thread from the bobbin and after that leave it the wind itself.
janome sewing machine wind bobbin
10. Wind it full or how much ever required. Then stop pushing the foot control.
a. Bring the bobbin to the left position.
b. Push the hand wheel back.
c. switch the power supply off.

11. Cut the thread connected to the spool.
12. Cut the thread hanging out of bobbin hole and the bobbin is now ready to use.


Hope you find this useful?
Thanks,
Preethi.

If you enjoyed reading this you can either like my facebook page to get all updates and more or you can opt to receive posts via email. Don't forget to activate your subscription though!

Friday 24 January 2014

KCW - thinking of 2 options

Hi All, I'm participating in KCW January. This is the first time I'm participating in such an event (dont think it can be called an event or a competition ??). Everyday of next week I need to sew or do something related to sewing for 1 hr everyday. I'm not sure how I'm going to manage that though. I'm thinking what to make. My options so far are:
1. flat front back elastic skirt - I've learnt a lot from my mistakes in this checked skirt and a  skirt from dupatta. There is another one I haven't posted yet which I will soon do. I'm always thinking if the next post I do should be something that I have created or something new and I just end up only thinking and doing none :). Well there isn't much I've made that I haven't posted already - just 2-3 dresses.

I generally start with basic measurement of waist for my daughter, figure out the seam allowances, fold width and hem length. I also base it on the type of fabric I'm using and the gathering I want.For KCW I thought I should just put some maths around it with some variables like gathering, hem width etc... so I dont need to calculate everytime. So that is something I want to do before the start of KCW.

2. Basic tunic with lining.
I generally always trace around an existing well fitting tunic or t shirt. I have made a tracing on paper couple of times before but they end up getting wrinkled, torn or lost. I thought I should digitize it and just trace it on my computer. :). Not the best way I know.

If I choose option 1 I want to make a readily available maths before the challenge week and if I choose option 2 I want to digitize the pattern before the week. By end of tomorrow whatever I fancy I'll implement the same on Sunday to be ready on Monday. Thats the plan of course. Lets see how it goes. I'll keep you posted. :)
Have a great weekend.

Thanks,
Preethi.

If you enjoyed reading this you can either like my facebook page to get all updates and more or you can opt to receive posts via email. Don't forget to activate your subscription though!

Monday 20 January 2014

Cm or inches?

Sewing metrics - Cm or inches


I've been wondering whether to use cm or inches for my measurements. Most of the online resources use inches for measurements. As long as it is in whole numbers I'm fine but when it starts talking on 1/8th 5/8th of an inch I get lost. I've always used cm in my school and college except for height of a person for some reason. Or atleast I only remember using cm.
I thought I should be using cm for 2 reasons :
1. Being from India and brought up using metric systems I dont understand nor get an idea of sizes in inches. 5 cm and I immediately can picturise the length.
2. My computer doesn't understand 1/8th or 5/8th of wn inch or may be I dont know to instruct it. Decimals looks easy and simple to me and the computer.

Which do you prefer? Cm or inches?
Thanks,
Preethi.

If you enjoyed reading this you can either like my facebook page to get all updates and more or you can opt to receive posts via email. Don't forget to activate your subscription though!

Sunday 19 January 2014

Flat front back elastic Second try

*UPDATE* - I've created a pattern for this. Pls check  Phus Phus skirt free pattern

So this was my second try to flat front back elastic skirt. Sorry I'm posting in reverse and I haven't yet posted my first try. It was a disaster. You can see my third attempt of flat front back elastic skirt. I'm happy with the way my third one has turned out.

This looks great but when worn not so much.

For the back elastic I stitched it on one side of side seam with a safety pin attached to other end. After I sew the waistband to the skirt with a small opening I then pulled it to other end of side seam and stitched on top of skirt and elastic. I should better do a tutorial for this with pictures, although I'm now thinking of another easy way. :)

The front still looks good.

Have a look at the back. First its not neat and second the way it gathers around the back is not even. I have found a solution to this.
Learning: 
1. First stitch the top part of the waistband close to the edge before inserting elastic like I did with cirle skirt and flat front elastic back skirt. I topstiched the skirt after inserting elastic in former and before in latter. I'd do it before.
2. Follow step 3 to stitch in middle like circle skirt elastic fix


The elastic at the back keeps turning up. I don;t know why this happens. Can you help?

UPDATE - My new  phus phus skirt is sewn in such a way that it doesn't turn. :)
I did try to fix the back using the phus phus skirt stitching in the middle of elastic but couldn't. More on this post - Tried fixing turning of elastic at the back .


Thanks,
Preethi.

If you enjoyed reading this you can either like my facebook page to get all updates and more or you can opt to receive posts via email. Don't forget to activate your subscription though!

Saturday 18 January 2014

What is seam allowance

Seam allowance - What is it and when to use smaller or larger seam allowances:


Seam allowance is the distance from the edge of the fabric to the stitching line. I generally use
smaller seam allowances  for:
- curved areas because it is easier to manage. My learning from difficulty  in sewing sleeves got me have smaller seam allowances
larger seam allowances for:
- straight finishes and especially when gathering is required because of the number of stitches needed within seam allowance to gather fabric.

How to sew for a given seam allowance:


Seam allowance plate guide
I'm here using a 1.5 cm seam allowance.  You can see on the plate that seam allowances are marked to the right and left of the sewing foot.


 seam allowance marking on sewing plate
 You'll need to position your fabric such that the fabric cut corner (circled in red) meets the seam allowance line (circled in blue) at the required seam allowance.


How to sew for a particular seam allowance
 I've here positioned it for 1.5 cm.

What is seam allowance and how much to use
Here it is - 1.5 cm seam allowance.


My machine doesn't have the needle in the center position so the seam allowance from the needle position to the guide on the machine is slightly larger than what the guide shows.
So I position my fabric slightly before the guide value I keep consistent seam allowance.

-Preethi.

If you enjoyed reading this you can either like my facebook page to get all updates and more or you can opt to receive posts via email. Don't forget to activate your subscription though!

How to fix twisted elastic in skirt - Fixed

Fix twisted elastic in waistband


I stitched this skirt for my daughter, but the elastic in the skirt was always twisting and I stopped putting it on for my daughter. It was sad because it looked great on her. I've sewn another skirt with flat front and used the tricks and learning there to correct this one, so here it is how I fixed it.
If you sewing up a waistband with elastic I'd recommend to this tutorial which shows how to insert elastic at the back while front is flat. The same can be applied for a full elastic as well.

fix elastic twisted inside the waistband
I've sewn a few skirts before blogged here where I stitched on top edge of the waistband. It helps to keep the elastic in place. Here I went a step further. I'm showing the steps below
straighten elastic in skirt waistband

1. Straighten elastic:

First I straightened up the elastic in the waistband by pulling the waistband and skirt away from each other. It took a good 10 minutes. Had I put it on again it would twist.

2. Edge stitch waistband on top of elastic and fabric:

I then stitched the top edge of the waistband as close as possible to the edge. Because the elastic in the skirt was tight inside the waistband I had to stitch on top of the elastic,  else like here I'd have stitched the top edge before inserting the elastic which I actually prefer.
Pull as you stitch. Sorry I didn't take with my hands but you can see in below pic.
How to fix twisted elastic in elastic

3. Stitch in middle of waistband:

Do another round of stitching running in the middle of the waistband (yes, on top on the elastic) pulling on either sides so the fabric is not gathered. I have to admit it takes some energy to do that.
I'd normally mark the center and quarter points of the waistband and elastic to align correctly, but since it was already sewn, I had to make do.
There it is finished.
Neat.


The free skirt patterns - gathered skirt free pattern and pleated skirt free pattern both have elastic at the back and I've finished off using the same method.
 How do you avoid elastic turning inside skirts, pajamas?

Thanks for reading. For more sewing tutorials, tips and tricks please refer Sewing tutorials page.

Thanks,
Preethi.

If you enjoyed reading this you can either like my facebook page to get all updates and more or you can opt to receive posts via email. Don't forget to activate your subscription though!

Related Posts Plugin for WordPress, Blogger...