Thursday, 10 April 2014

Nirma skirt - 4 ways to hem

For all the different types of finishing the circle skirt, I've created a separate post which is more generic - 4 ways to hem circle skirt.
You can use any of the methods, my favorite is the double fold method which I'm going to show you here as well as the tutorial was only using miniature fabric pieces.
I've also finished the hem in the most simple zig zag finish method for the nirma skirt that I finished well under 1 hour.

For full instructions to make a Nirma skirt pls goto NIRMA SKIRT FREE PATTERN.

We are trying to sew a larger piece of circle onto a smaller circle - because this essentially is a circle skirt. So this method is quite a complex one and involves a 3 times stitching and 2 times pressing.

How to hem circle skirt or curved edge

Detailed steps below:
1. Sew 1 cm from the edge of the skirt hem. This will help to fold the fabric and also prevent from stretching. I generally do this as soon as I cut the skirt piece.
2. Fold wrong sides together at 1 cm fold line and press.
3. Sew over the edge (this is the second round of sewing over the first). This will help with the second fold and keep the first fold in place.
How to finish hem of cirlce skirt
4. This is how it looks. Already looks neat.
5. Fold under another 1 cm and press.
6. Just another view.
7. I cut the excess out as I didn't want bulk and wanted the skirt to flow around. This is upto you. I have previously done it without cutting as well but I prefer to cut.
It needs to be put cut evenly - not like mine :)
8. I roughly pin all around so I know if I'm running excess fabric on top. You can only know this once you sew it.
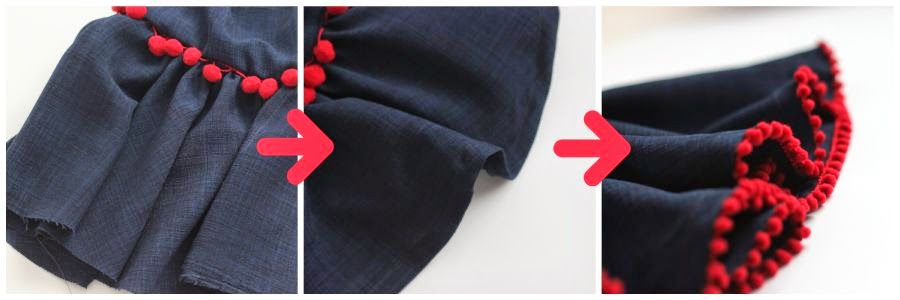
9. The trick here to keep the lower fabric tight by pulling and upper fabric loose (to be able to fit larger circle to a smaller one).
How to tuck fabric for no gathers
10. When you are sewing on the bias fabric its really easy but when you come to non bias side you may need to place in a tuck for the upper fabric to be accommodated by the lower one. The pins that you have placed randomly is a good indicator if you are running more on the upper fabric.
11. This is how it looks. Should have taken a better photo I know :)
Iron circle skirt
12. Give it a good press.
13. Looks neat now.

14. Another view.
How to attach trimming to hem
15. I like to place the pom pom band below the hem and sew from the top. This way I know exactly how much of the pom pom side needs to be seen.
16. At the ends just sew over such that the pom poms look neat and continuous without gap.
17. Cut the ends.
How to add lace or trims to skirt
18. Finish!!


Thanks,
Preethi.

If you enjoyed reading this you can either like my facebook page to get all updates and more or you can opt to receive posts via email. Don't forget to activate your subscription though!

4 ways to hem circle skirt


How to hem a circle skirt curved edge Double fold to hem circle skirt for a professional look Bias tape finish for a contrast look Zig zag finish circle skirt - easiest way Zig zag and fold circle skirt for a neat look from front Image Map

How to hem circle skirt or any curved edge

I've made many circle skirts now, and the nirma skirt is essentially a circle skirt and I've made many now. So its time for me to share my learning.
Click the image for the method you want to see.
Circle skirt although is the simplest to cut, I think it is the most difficult to sew - simply because we need to sew a much larger fabric onto a smaller fabric without gathering. It is tricky really. I'll here show the various methods I've used. My favorite here is double fold. It gives a very professional look - if I may say :)

All images are edited using picmonkey. 
I'm slowing moving away from gimp and using picmonkey.


I'll show you four different types here: (Note I have used white thread just to show, you would need to use matching thread)

Zig zag finish circle skirt

1. Zig Zag finish or serger to hem curved edge

( if you have one) This is the easiest for a starter, but doesn't give a neat look though. You can learn how to zig zag here.
Difficulty level: super easy, very simple
Look: not bad
Time taken : hardly


I've used this method for the 1 hour nirma skirt I made. It was less than an hour because I used the easiest method to hem.
Zig zag stitch finish a circle skirt curved edge hem
Once you have zig zag stitched if there are threads hanging then you can cut them out.


2. Zig zag and fold to hem curved edge:

Difficulty level: easy, simple
Look: not bad
Time taken: 15 minutes. (this is for me)


This gives a better finish than above zig zag. It is neat from front but since a circle skirt twirls the zig zag will the seen which is on the wrong side.
I've used this method in this circle skirt
zig zag stitch and fold to hem a circle skirt
 a. Zig zag stitch the ends and sew 1 cm from the edge.
Sew to fold and hem circle skirt
b. Sew all around the skirt. Above is just for the tutorial and I've just used a curved fabric piece ..  obvious I know but just thought of mentioning, just in case :)
Sewing makes folding and pressing easy
c. Press wrong sides together at the sewn line with the sewn line folded towards the wrong side so it is not seen.
zing zag and fold to hem curved edge
d. Sew on top of the zig zag stitch.
Tips and tricks to sew a circle skirt

e. In case you cannot manage the fabric (the top part is much larger than the bottom in figure above) then use a pin to push some of the fabric under the presser. You would get a small pucker there but that is on the inside and will not be seen)


3. Bias Tape to hem curved edge:


Difficulty level: easy, simple
Look: Good
Time taken: 15 minutes. (this is for me)


Bias tape finish to a circular curved edge
 a. With right sides together, pin the bias tape all around the skirt edge and leave a 4 cm tail on either side of the middle line shown. After that start to sew from the point mentioned Start up until point mentioned End. The start and end are about 6 cm apart.
Sewing bias tape to circle edge
 b. Sew all around
How to stitch bias tape together
 c. You can see here the gap, we left
How to finish ends with bias tapes
 d. Pinch the tails with right sides together at the middle line and pin together.
How to sew bias tape ends together
 e. Sew on the pinned line.
Bias tape finish for raw edges
 f. Cut the tails close to the stitching line.
Bias tape finishing
 g. Sew close the gap we left of about 6cm
 h. This is how it looks.
 i. Press the bias towards the wrong side of skirt

 j. If there is any extra fabric (bias) than the skirt below then push in some of the bias into the presser foot or raise the presser foot creating a pucker. It is on the inside, so it will not be seen.


4. Double Fold hem circular edge: 

Difficulty level: medium
Look: quite professional.
Time taken: 25 minutes (this is for me)

This is the most complex of the lot and the most professional looking. However it is also the most time consuming way to finish the skirt - but I'd say it is worth the time and effort.
I've used this method  black circle skirtnirma skirt, nirma skirt, nirma skirt.
Nirma skirt free pattern with full instructions to finish circle skirt


 a. From the edge of the skirt sew 1 cm from it. This stitching line will help to fold the fabric.
Sew and Fold to press easy
 b. Press the wrong sides together at the stitching line with stitching line towards the wrong side.
 c. Just go over the whole skirt again to press.
How to finish circle skirt hem by ironing
 d. Now sew again over the first stitching line all over.
 e. Sew all along.
 f. Again fold 1 cm same side as before (right with wrong side this time since it was already folded once). Press.
How to hem a circle skirt perfectly with tips and tricks
 g. Press all over again.
 h. Sew on top of the stitching line. you will have 2 stitching line here. On the bias fabric side it is easy since you can stretch the fabric as you sew but on non bias side it is difficult. So there are 2 ways here: One is to create a plucker.
i. Two is to pull the bottom fabric and leave the top fold loose as you sew. I have done this for all skirts and have managed to sew one of them without a single plucker.
Thanks,
Preethi.

If you enjoyed reading this you can either like my facebook page to get all updates and more or you can opt to receive posts via email. Don't forget to activate your subscription though!

Related Posts Plugin for WordPress, Blogger...